Watch out for many more new videos!
Thursday, December 30, 2010
Monday, December 27, 2010
5 Line Eyebrow Wax Systems
This is one of the best 5 Line Eyebrow Wax system advice videos I have seen. Great for all of you that are new to eyebrow sculpting!
Something a Little Different!
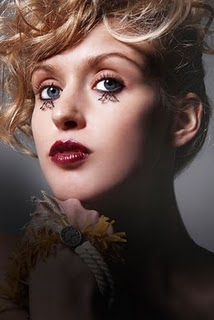
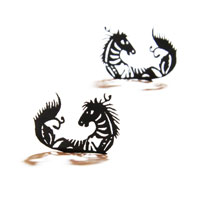
Found these cool strip eyelashes - well they are paper eyelashes but do the same thing as strip lashes. They are inspired by the art of Chinese paper-cutting, Eyelashes blend an element of traditional culture with contemporary design. Intricately cut and delicately pretty, Eyelashes are available in three styles, each infused with symbolic meaning rooted in Chinese culture: Horses: symbolic of success Peony: for happiness and good fortune Peach blossom: a symbol of love and romance Unique and expressive, Eyelashes come in two sizes: accentuate the corners of your eyes with the smaller lashes for a subtle daytime look, or make a statement with the full lashes for a special occasion. | |||
Dimension: 42*18mm Material: paper | |||
Designer: Ting yu Wang You can purchase them online at http://www.shoplunaandcurious.com/ | |||
Taping - Some quick Tips
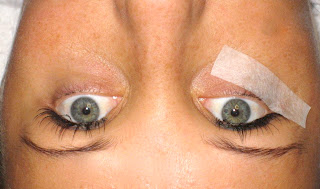
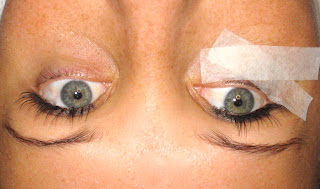
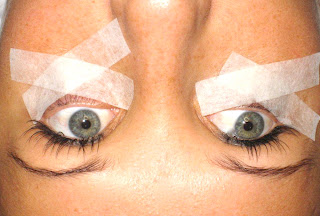
Below are some handy images for taping. The photos are of an infill client that has had lashes on for 4 weeks. I use three different methods to show you how it can be done. Personally I only use the Nexcare tape method as it has less irritation and better results.
The first is the original V tape method. 2 small strips of micropore tape are cut for each eye. You should stick them to the back of your hand a few times before placing them on clients eyes as they have quite a bit of stick and can pull and irritate skin if placed straight onto the client.
Start at the outer corner of the eye and place tape down.
Place the second piece of tape from the inner corner to the middle to form a V.
Make sure you have caught all the bottom lashes in the tape.
The second method is the tape and gel pads. You tape as above then apply the gel pads over the tape. as you can see I always place my gel pads quite a bit lower than the tape as they can cause irritation when placed too close to the eye, especially if the client has naturally watery eyes.
This is an example of how NOT to place gel eyepads!
The final taping is using my preferred method - the tape cutting tutorial is here:
Tape Cutting Tutorial
The benefits of this method are that the tape is hypo allergenic - which means no allergies. They are also big enough for you to wipe excess glue on, and your tweezers will not pierce the tape in the event that you press on it.
I recommend using a swipe of Vasoline under the eyes prior to placing the tape so that there is no discomfort when removing.
All the above products can be purchased here:
Tape Products
What to look for in a Trainer
We often get asked about training out of Australia and what course are the best. Without one of us having previously done the course, its pretty hard to make comment. Most of us have trained with more than one ELE company and have helped develop our own training - but for all of you who are not in Australia or cannot get to one of our trainers the following may prove helpful....
- Make sure you have a one on one class - this way you will be getting ALL the trainers attention and you wont feel overwhelmed. I noted someone commented that people missed out on certain things in the lash perfect class. When i retrain people this is the biggest reason I am given for choosing to be re trained. People dont feel that they are given enuf attention or they feel like they cant ask questions - you are paying for the trainers knowledge - soak it up!!!
- Second is that you cant learn just from watching a DVD, you need someone showing you in real life! You need a trainer who is willing to teach you everything they know in order for you to be the best. They should have previous training skills (here in AUS we have a cert IV in training) and they should have at least 5 years experience.
- Dont pay over $1,200 for training and a kit - anything over that is just a company being money hungry. You can jump on ourr site and compare the contents of our kits to others - you may as well be informed before you go laying out all your hard earned cash.
- Make sure you are getting ongoing support - I cannot stress this point enuf. You will always need your questions answered and alot of training places give you your training and then send you on your way - this is really bad, as you are learning you will have more and more questions that will need to be answered as you progress along your lash journey. We do have a 24/7 hotine and a free email advice line for anyone - not just our students but anyone who needs assistance (info@hypnoticlashes.com) we do this as we feel that we as stylists should help each other out where ever possible.
The other thing i would look for is a course that is at least 2 full days long. you should get a manual and you should also get certified once you have proven you are competent - this may mean you will have to submit photos of your work over a certain time period. This is a fair ask as it allows the trainer to see you progressing.
Ask questions:
How long have you been training?
Do you have a qualification in beauty, training and eyelash extensions?
Do you stock your own product?
Do you provide ongoing support and if yes how do i contact you and how fast do you respond?
What method do you use to train? ie. books, dvd, practical, observation - your trainer should offer several methods of training in their course as each individual learns differently.
Will I receive a qualification or just a certificate stating I have completed a course?
Your trainer should be able to answer all these questions without hesitation - if they dont know the answers then move to the next company.
Remember:
The bitterness of poor quality training lingers long after the sweetness of low price is forgotten.
Tuesday, December 21, 2010
Just A Quick Rave...
So our Rave for today is....
ENDOTA ORGANIC ESSENTIAL OILS!
This stuff is to die for! All natural ingredients and they smell awesome!
All are 10ml bottles and are either $23.00 or $26.00
They come in the following down to earth blends:
BREATH - lavender, eucalyptus, lemon and peppermint.
CLARITY - Lemon, orange and mandarin.
CALM - Bergamot, lavender and Ylang Ylang.
PERSPECTIVE - Orange, spruce, patchouli and cinnamon
DREAM - Ylang Ylang, orange and patchouli
SPIRIT - Cedarwood and sandalwood
I use these everyday to either uplift or calm clients while they relax and get their lashes done. I usually start my consultation off by asking how their day has been and how they are feeling. If they are down or need a lift then I use the appropriate essential oil to give them a little something more from my treatment.
You can order online at:
Endota Essential Oils
I am in no way affiliated with Endota - or have been paid in any way for this blog - I simply comment on things that I feel are great for our business and our salon :)
Thursday, December 16, 2010
Make up 101 Lesson Two - Eyebrows
Personally I think that eyebrows make or break the face! The give shape and contour and should be given respect!
Throughout the ages the shapes and styles of brows have changed, and as fashion changes so do our brow shapes:
The 40's and 50's saw ladies remove their brows completely and pencil perfect shapes in..
The 60's and 70's hair grew everywhere, including the brows - nothing was trim and tidy!...
The 70's also saw the start of the "handle bar brows" - where the start of the brow had a round ball
The 80's was thin teeny weeny brows
The 90's was the sharp angles and lines
Todays brows are back to natural and trimmed...
As a make up artist you should know the golden rules to brow shaping, although you should not attempt to wax or trim unless you are qualified and know what you are doing.
We Will use the image above to shape the brows.
The Black line is an indication of where the eyebrow should start. This has its pros and cons; use your eye id the person has either a wide nose or a really thin nose.
The white line indicates where the natural arch should be - have the model look straight ahead when taking this measurement. Depending on the style and the fashion the arch can be changed but this is a general idea for the natural look.
The grey line is where the brow should end. Again use your eye and dont fill in if you think it looks too long.
There are loads of write up's on the web about styling brows to suite different face shape - do some reading and know what to look for.
As far as eyebrows and make up artists go - you are there to shape the brow or completely remove it and do as the brief dictates. You should always use a powder to give a natural fill - and a pencil to give strong lines.
Always comb the brows before you do any make up to see where they fall naturally.
Next lesson : Colour Theory
Make Up 101 Lesson One - Starting Out
I guess the best starting block for anyone before they even pick up a brush is to think about how they would like to be treated when dealing with a make up artist.
Always remember to be professional, if you are working as a freelance make up artist then, you are the face of your business, you are in control of how people perceive you and you are responsible for building a great reputation.
Always make sure you have excellent presentation and hygiene - if you can, its great to get your self a plain black shirt made up with your name and logo on it. That way you don't have to think about what to wear and you get the added bonus of advertising when any photographers are snapping pics.
Make sure you are organised and you only book in what you can actually do or have time for. If you get too busy it may be necessary to employ an assistant to help prep and clean. Make sure your kit is always stocked and clean - there is nothing worse than running out of a great product on the day!
Always have business cards on you to hand out to any potential clients and also make sure you start collecting images for your portfolio - people always respond better to visual images.
Lets delve a little deeper into hygiene for you and your clients:
Health and hygiene procedures must be followed at all times. You MUST carry disposables with you in your kit, these include:
- mascara brushes
- cotton tips
- cotton balls
- disposable lip brushes
- sponges
- tissues
I usually carry my kit and a bag full of all the above plus all my cleansers and brush cleaners. Any brushes that are used should be sprayed with brush cleaner in between clients at a job. Once you notice your brushes getting a little dirty (and this will vary depending on how much work you do), you will need to wash your brushes with warm water and shampoo. They will need to be rinsed well and left to dry flat on a towel. You may condition your brushes also, I usually do mine every 4-6 months.
If a client has broken or infected skin, you should avoid make up n that area unless requested. you should use disposable items where ever possible. A good tip for broken skin is to apply liquid bandaid to seal the wound.
When you apply eyeliner or lip liner pencil always make sure you sharpen it first to remove the outer layer. Always apply mascara with a disposable spoolie. Always scrape off lipstick onto the back of your hand and apply from there.
I will do another post specifically on the kit and what you will need to get started as it is a whole lesson on its own! And i also need to cover things about buying make up as well as what your do's and dont's are.
Think of the face a your blank canvas:
You should know a thing or two about how to advise your clients to care for their skin. This is useful for a few reasons; you want them to have the best possible skin to work on and you want the skin to be free of oils and impurities that will interfere with the make up application.
Oily skin should exfoliate once per week.
Normal skin should exfoliate twice per week
Dry skin should exfoliate up to four times per week.
I personally do not keep a moisturizer in my make up kit - I think that there are just too many skin types to be able to cater for! I do though carry heaps of primer!!
Primer:
It is essential to a long lasting, great base that you apply primer to every face no matter what skin type they have.
I carry a few different types of primer - the staples are a moisturizer style one and also a silicone based one. The moisturizer type is easily absorbed into the skin and is great for younger skins. The silicone type is great for older skins, or where you have uneven surfaces.
The point of the primer is to create a barrier between the skins surface and the make up - this stops the make up from being absorbed into the skin and disappearing thus helps in the longevity of the make up if worn for long periods of time or if you are under bright lights and the model is heating up.
Click Here for Next Lesson - Eyebrows
Please feel free to add comments or advice!
Thursday, December 2, 2010
Cutting and Storing Foam Tape Tutorial
I have a product on my website that I just love to bits for taping down the lower lashes - Nexcare Absolute Waterproof Tape.
It has so many added benefits such as:
3. Place the tape onto the baking paper in strips, side by side. A tip here is when you are laying out the tape dont stretch it out, just let the tape fall onto the baking paper relaxed and then press it down to hold in place with your hand. You dont want the tape being really stretched out or it will take on a funny shape.
It has so many added benefits such as:
- Hypoallergenic and latex free
- great for sensitive skin and it comes off easily
- Stretches and flexes with the skin
- Is made of a soft foam but is strong enough that you can rest tweezers on it without piercing through it
- great for using on clients who dont like the gel pads - the gel pads often give clients reactions and cause the eyes to sting. This is because the gel pads are not actually designed to be mm from the rims of the eyes. They are meant to be under the eye area but not that close.
The tape comes in a roll of 4.57 meters of the stuff so it will give you heaps of eyepads. It is 1 inch thick so I have done a tutorial which will give you a visual of how to cut and store the tape!
What you will need:
- A roll of Nexcare tape - see the online store at Buy Nexcare Tape
- Some baking paper
- A pair of scissors
- a marker
1. Get your piece of baking paper and lay it out flat.
2. Get your roll of tape and unravel it so that you have a length to lay on the baking paper.
4. The you will take your scissors and cut between each strip leaving say, 3mm on each side of the tape so you have room to pull it off later when you are using it.
5. Once you have your long strips, you will cut them into shorter strips of say 4cm. These are going to be the size of your pads.
6. On your first go of cutting out your pads shape, you may want to take the marker and draw a half circle as a guide as shown in the picture.
7. Once you have drawn the half circle cut along the line - there you have it your very own foam eyepad tape!
Once you have cut out a few you will be able to do it without marking a line on each one - a good tip is to use your small lash scissors to cut the half circle or at least use a very sharp pair of scissors or the job will become a pain!
If you have any tutorial that you would like us to add on our blog please feel free to contribute - you will be credited for all your hard work and given a link to your page! email us at info@hypnoticlashes.com
Subscribe to:
Comments (Atom)


